
Vegan Top 9 Free Monster Rice Krispies
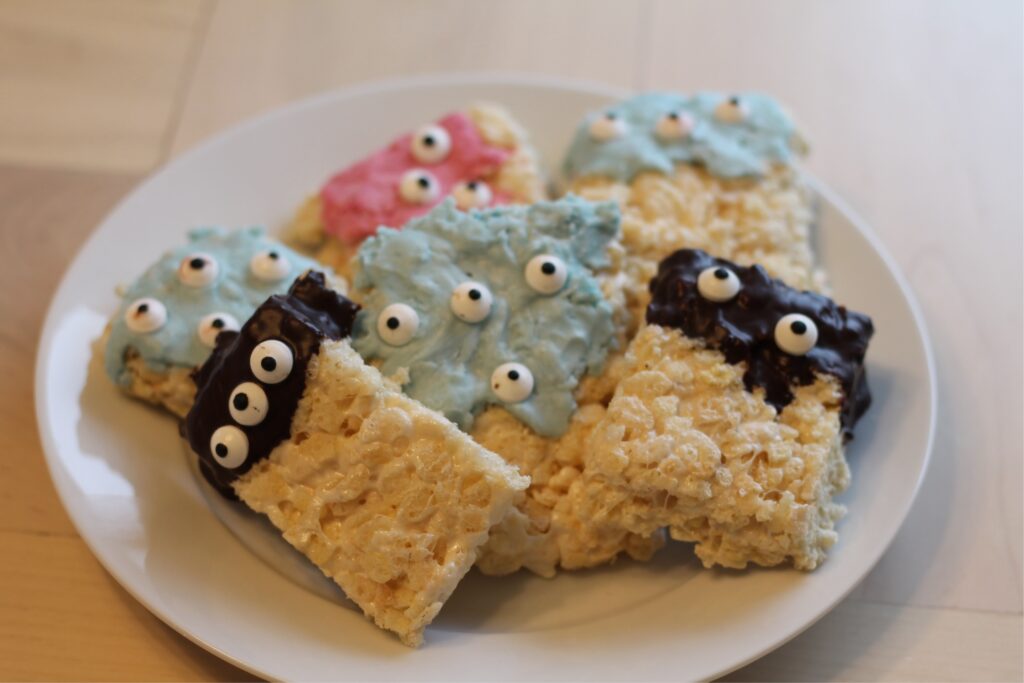
Sometimes the simplest treats are the most fun. These vegan Monster Rice Krispies are chewy, chocolatey, and full of personality. They’re free from the top nine allergens, so everyone can enjoy them — even during those tricky holiday parties when you’re trying to keep things safe and inclusive. I love how they bring out everyone’s creative side. You can make them spooky, silly, or totally adorable. Plus, no baking is required.
This recipe stays close to the classic Rice Krispie treat — just updated with dairy-free butter, vegan marshmallows, and crisp rice cereal. Once cooled, they’re dipped and decorated with allergen-free chocolate and colorful sprinkles. You’ll also add candy eyes to give each treat a fun monster look. Whether you’re making them for Halloween, a birthday, or a rainy weekend project, they’re always a hit.
And honestly, who can resist a chewy square covered in chocolate and sprinkles? The combination of crunch, sweetness, and playfulness makes these the ultimate allergy-friendly party snack.
The History of Rice Krispie Treats
Before these little monsters showed up, the original Rice Krispies Treat was born in 1939 at Kellogg’s headquarters in Battle Creek, Michigan. Two Kellogg’s employees, Mildred Day and Malitta Jensen, created it as an easy dessert for a Camp Fire Girls fundraiser. The recipe combined butter, marshmallows, and Rice Krispies cereal — and it was such a success that Kellogg’s began printing it on every cereal box soon after.
You can read more about that origin story from Back Then History, which shares how these treats became a household name: backthenhistory.com. Mashed also dives into the real story behind Kellogg’s invention: mashed.com.
Since then, the recipe has been reinvented countless times — with chocolate, peanut butter, and even fancy versions using salted caramel. In recent years, vegan bakers and allergy-friendly creators have adapted it to be safe for everyone. Fork and Beans, for instance, made a green “Monster Rice Cereal Treat” that inspired this version: forkandbeans.com.
What I love most about this recipe’s evolution is how easy it is to customize. You can take something that’s been around for almost a century and make it completely new with just a few tweaks.
Ingredients and Substitutions
Here’s what you’ll need to make these Vegan Top 9 Free Monster Rice Krispies. Each ingredient has a purpose, but I’ll also share substitutions so you can work with what you have.
For the Rice Krispie Treats:
- Vegan soy-free butter
- Vegan yummalo marshmallows
- Crispy rice cereal
For Decorating the Monsters:
- Enjoy Life white chocolate
- Enjoy Life dark chocolate
- Gel food coloring (make sure it’s gel-based, not water-based)
- Sweets Indeed allergy-friendly candy eyes
- Soy-free sprinkles
If you can’t find vegan butter, try a coconut oil blend. It melts similarly and gives a slightly richer flavor. Vegan marshmallows are a must — Dandies are a great top-9-free option. For cereal, double-check the label to ensure it’s gluten-free if needed.
You can skip the white chocolate dye if you prefer, but I love the pop of color it adds. Gel coloring works beautifully — just avoid water-based dyes, as they’ll make the chocolate seize. Candy eyes and sprinkles are optional, but they make these treats truly come alive.
Step-by-Step Instructions
Start by making the base. Line an 8- or 9-inch square baking dish with parchment paper. This will make it easier to lift the treats out later.
In a large saucepan, melt 3 tablespoons of vegan soy-free butter over low heat. Once it’s melted, add the 10 ounces of mini marshmallows. Stir constantly until the marshmallows are completely melted and smooth.
Remove the pan from heat and add 5 cups of crispy rice cereal. Stir quickly to coat every piece before the mixture starts to firm up. Press the mixture evenly into the prepared pan. I like to use a piece of parchment paper or a silicone spatula to press it down without sticking. Let it cool completely before cutting into squares or rectangles.
Now for the monster fun. Melt 1 cup of Enjoy Life white chocolate in a microwave-safe bowl, using 20-second bursts and stirring between each until smooth. Do the same with 2 cups of Enjoy Life dark chocolate in a separate bowl.
Color the white chocolate with gel food coloring. You can make green, purple, or orange monsters — whatever fits your theme. Dip or drizzle your cooled Rice Krispie squares in the chocolates, alternating colors. While the coating is still wet, add candy eyes and soy-free sprinkles.
Let them set at room temperature or pop them in the fridge for about 10 minutes. Once the chocolate firms up, they’re ready to serve.
Tips and Tricks
If you want to make the process easier, melt the marshmallows on very low heat. Vegan versions tend to melt slower than regular ones, so patience helps prevent clumping or scorching.
If your mixture starts to dry before you’ve spread it, warm it gently for a few seconds and stir again. When coloring white chocolate, remember that only gel coloring works — water causes seizing, which turns the chocolate grainy.
To store, place the treats in an airtight container with parchment between layers. They’ll stay fresh for two to three days at room temperature or up to a month in the freezer. To freeze, wrap each treat individually to keep them from sticking together.
And if you ever want to make them ahead for a party, you can prepare the base one day and decorate the next. That way, your chocolate stays glossy and fresh.
FAQ
Are these Rice Krispies really top 9 allergen free?
Yes — as long as you use brands like Enjoy Life for chocolate, Dandies for marshmallows, and Sweets Indeed for decorations. Always check the labels for cross-contamination, but these are among the safest options available.
Why did my chocolate seize up when I added food coloring?
You probably used water-based food coloring. Always use gel or oil-based coloring for melting chocolate. Even a drop of water can cause the chocolate to thicken and clump.
Can I use another cereal?
Definitely. You can try puffed quinoa, corn flakes, or gluten-free crisp rice if that’s what you have. Just aim for something light and crisp so it binds well with the marshmallows.
Can I make these without chocolate?
Sure — you can skip the coating and just press candy eyes and sprinkles right into the top of the treats before they set. They’ll still look festive.
How long do they last?
They’re best within three days, but if sealed tightly, they’ll keep their texture up to a week. For longer storage, freeze them and thaw before serving.
Can kids help make them?
Absolutely! Kids love stirring the cereal and decorating their own monsters. Just handle the melting and coloring parts yourself, since chocolate and marshmallows can get hot.
These Vegan Top 9 Free Monster Rice Krispies are cheerful, chewy, and safe for almost everyone. They’re the kind of treat that makes people smile before they even take a bite. Whether you’re whipping up a batch for Halloween night, a school event, or a cozy movie marathon, they’re a sweet reminder that allergy-friendly baking can be just as fun — and maybe even a little more creative.
Print
Vegan Monster Rice Krispies (Gluten, Soy, & Nut Free)
Ingredients
For Making Rice Krispie Treats:
- 3 TB vegan soy free butter
- 10 ounces vegan yummalo marshmallows
- 5 cups crispy rice cereal
For Making Monsters:
- 1 cup enjoy life white chocolate
- 2 cup enjoy life dark chocolate
- Gel food coloring, for dyeing the white chocolate (water based food coloring will make the white chocolate seize)
- Sweets Indeed allergy friendly candy eyes
- 3 TB soy free sprinkles
Instructions
- Line a square pan with parchment paper.
- Melt vegan soy-free butter in a large pot over low heat.
- Add mini marshmallows and stir until smooth.
- Remove from heat and mix in crispy rice cereal until coated.
- Press into the pan and let cool completely.
- Cut into squares.
- Melt dark and white chocolates separately.
- Tint white chocolate with gel food coloring (not water-based).
- Dip or drizzle treats in chocolate.
- Add candy eyes and sprinkles while chocolate is wet.
- Let set at room temp or chill until firm.