
Pinwheel Cookies — Top 9 Free
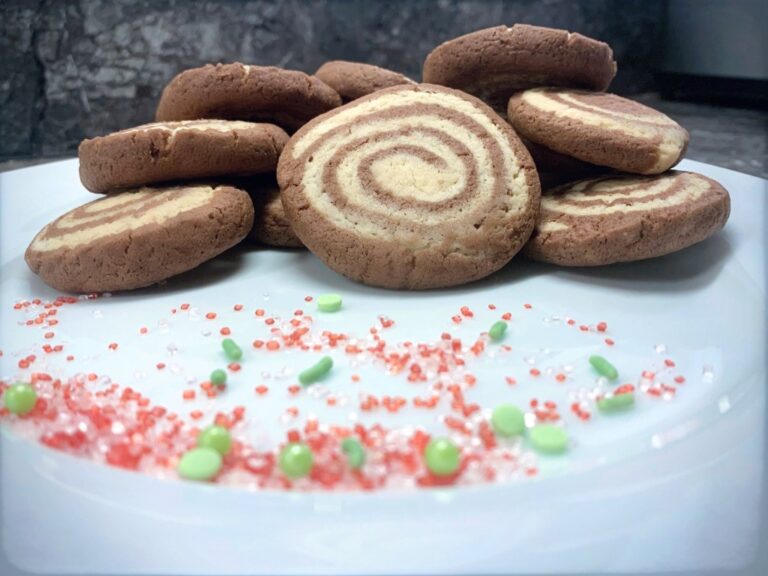
Pinwheel cookies are a visually striking and delicious treat made by rolling two different colored doughs together to create a swirl pattern, resembling a pinwheel. For this recipe one dough is a traditional flavor like vanilla, while the other is often flavored with cocoa powder for a chocolate version, though variations can include different colors or flavors, depending on the recipe.
These cookies are buttery and slightly crisp, with a tender texture. They’re popular during the holiday season due to their festive appearance, and their combination of flavors makes them a crowd favorite.
History of Cookies
Cookies originated in Persia in the 7th century as small sweet cakes. Dutch settlers brought them to America in the 1600s, where the word “cookie” came from the Dutch “koekje.” In 1938, Ruth Wakefield invented the chocolate chip cookie, which became a classic. By the 20th century, cookies were mass-produced and are now enjoyed in many varieties worldwide. If you want to find out more about the history of cookies, here is where I found some of my information!
This post may contain affiliate links. See full disclosure here.
Ingredients & Substitutes
- Vegetable shortening (palm) or homemade vegan butter
- Packed brown sugar
- Granulated sugar
- Lukewarm water
- Vanilla extract
- Gluten-free 1:1 baking flour blend (such as Namaste Flour blend)
- Salt
- Baking soda
- Baking powder
How to Make Pinwheel Cookies
In a KitchenAid mixer or large bowl, beat together the butter and sugars until fluffy.
Add the flour, baking powder, vanilla, and the water/baking powder/oil mixture, mixing until a dough ball forms.
Divide the dough in half, then mix cocoa powder into one half. Alternatively, you can skip the cocoa and color both halves with festive dyes, or divide the dough into three parts for different colors.
Wrap the dough balls and refrigerate for 45 minutes. Roll each dough ball between two pieces of parchment paper until you achieve a 9×13” rectangle. Remove the top piece of parchment from each rectangle, then carefully flip them on top of each other.
Tightly roll the dough into a long 13-inch log, cover with plastic wrap, and chill in the fridge for at least 2 hours, or until firm.
Once chilled, slice the log into 34-36 cookies, each about 1/4 inch thick.
Preheat the oven to 350°F and let the cookies come to room temperature for 10 minutes.
Line two baking sheets with parchment paper and place the cookies 1 inch apart (about 15-20 cookies per sheet). Lightly flatten each cookie to prevent cracking and to maintain a smooth texture.
Bake for 10-12 minutes, or until the bottoms are lightly golden and the edges are firm. For a crunchier cookie, bake for the full 12 minutes.
Let the cookies cool on the sheet for 10 minutes, then transfer to a wire rack to cool completely.
Common Questions
- Why are my cookies flat?
This could be due to using too much butter, not enough flour, or overmixing the dough. Also, ensure your baking soda or baking powder is fresh. - How do I make my cookies softer?
Use more brown sugar, as it adds moisture. You can also slightly underbake them, so they stay softer when cooled. - How can I make my cookies thicker?
Chill the dough before baking, and make sure not to overmix it. You can also try adding more flour or using a higher-protein flour. - Can I freeze cookie dough?
Yes, you can freeze cookie dough for up to 3 months. Roll it into balls and freeze them on a baking sheet before transferring to a zip-top bag. - Why are my cookies too cakey?
Cakey cookies might result from too much flour, too much leavening, or overmixing the dough. Try reducing the flour or baking soda. - How do I prevent the cookies from spreading too much?
Chill the dough before baking, and make sure the dough isn’t too warm when scooping it onto the baking sheet. - How do I store these cookies?
Store them in an airtight container at room temperature for up to a week. For longer storage, freeze them.
Other Favorite Allergy Friendly Cookie Recipes


Vegan Pinwheel Cookies (Gluten, Soy, & Nut Free)
These are classic holiday cookies. So excited to share a top 8 allergen free recipe with you. It’s delicious and easy! Makes 36 (2inch) cookies. 15 mins prep, 12 mins cook time, and about 3 hours chill time. Total: 3 1/2 hours from start to finish.
Ingredients
- 3/4 cup soy free vegan butter, softened, OR homemade (if also seed free)
- 3/4 cup white sugar
- 2 cups all-purpose gluten free flour, I like this one
- 1 tsp baking powder
- 1/4 tsp salt
- 2 tsp vanilla
- 2 TB water + 2 tsp baking powder + 1 tsp olive oil, mixed together *See notes
- 1/4 cup cocoa powder

Instructions
- In a kitchen aid or large bowl, mix the butter and sugars together, till whipped.
- Add in the flour, baking powder, vanilla, and the water/baking powder/oil mixture till a dough ball forms.
- Split the dough in half and mix in cocoa powder to one of the halves. You can also choose to skip the cocoa powder and dye both halves a festive color or even do three different colors, dividing your dough into three parts.
- Wrap & chill the dough balls in the fridge for 45 mins.
- Roll out your dough balls in between two pieces of parchment till you have a 9×13” rectangle.
- Remove the top piece of parchment from each dough rectangle. Flip the rectangles on top of each other.
- Tightly roll the dough up into a long 13 inch log. Tightly cover the log in plastic wrap and place in fridge for at least 2 hours or until firm.
- Take the log out and cut into 34-36 (1/4 inch thick) cookies.
- Preheat oven to 350 & Let cookies come to room temperature for 10 mins.
- Line 2 baking pans with parchment and place your sliced cookies one inch apart from each other. (15-20 cookies per cookie sheet). Then, lightly flatten down each cookie as this will help the cookie not crack, but keep a smooth texture.
- Bake the cookies 10-12 mins or till the bottoms are lightly golden brown and cookies are a bit firm on the edges. If you want a crunchier, firmer, and less soft cookie, I definitely recommend baking for the full 12 mins.
- Cool in pan for 10 mins and then transfer to wire rack to finish cooling.
Notes
*The water/baking powder/oil mixture perfectly mimics the texture of 1 egg in this recipe. I do not recommend any other egg substitutes in this particular recipe as it will significantly change the cookies texture & flavor.