
Which Gluten Free Flour Should I Use?
There are many Gluten Free flours on the market. How do you know which one to cook with? Well, to mimic the profile of gluten, you need light starch for lightness in texture, protein for strength, elasticity for texture, and medium starch for holding structure. Every single gluten free flour will not have all four characteristics, which is why we mix gluten free flours together into a blend. My favorite store bought brand is currently Namaste. It is a blend of rice flours (the medium grain) & arrowroot (the light starch), xanthan gum (the binder to aid with elasticity), sorghum (the medium grain which contains higher sources of protein). So if making your own blend at home, I recommend choosing 2 medium grains (one containing a higher protein content), 1-2 starches, and 1 binder. The ratio I like so far is 2:1 for grain and starch + 1/4 tsp xanthan gum per cup of flour/starch. So for example:
- 2 cups fine white rice flour
- 2 cups sorghum flour
- 1 cup tapioca starch
- 1 cup potato starch
- 1 1/2 tsp xanthan gum (1/4 tsp per cup of flour & starch)
See my in depth guide to gluten free flours here for helping you make your own blend!
This post may contain affiliate links. See full disclosure HERE.
Why Potato Water?
This ingredient comes with a fun story. A couple generations ago, my Great Grandma N. made her bread on their farm using regular flour, yeast, leftover potato water, heavy cream/milk from their cows, and lard. What’s funny is this was originally the food Great Grandma N. fed her dogs, until my Grandma Catherine came into the story. Grandma Catherine tried a bite of the bread. It quickly then became Great Grandma N’s most popular recipe among her family and friends. A loaf of bread never lasted more than a day in their home. Everyone always said it was the best bread they ever had and one slice would fill a large dinner plate. (Don’t worry the dogs still got their fair share & their German Shepard, Lady, lived to be 19 years old!)
I thought about this story when trying to make my gluten free bread rise and become less dense and more elastic. One day, I decided to mash up some potatoes with some water and add it to my gluten free flour blend. It was the first time my bread ever rose!!! And it was fluffy! I was so excited. It quickly became a staple in our home and still is to this day. I’m not a scientist, but I think the potato water gives the bread more structure, and helps ingredients bind together while still maintaining moisture content and not drying out. That is why I use potato water.
How To Store The Bread?
Homemade bread can get hard after being in the fridge for a while due to a process called retrogradation. Retrogradation occurs when the starch molecules in the bread begin to crystallize as they cool down, causing the bread to become stiff and dry. This is because the refrigeration process causes the moisture in the bread to move to the surface, making the bread less moist and more susceptible to becoming stale.
Furthermore, refrigeration can also speed up the staling process by accelerating the process of retrogradation. This is because the lower temperatures in the fridge can cause the starch molecules to crystallize at a faster rate than they would at room temperature.
To prevent bread from getting hard after refrigeration, it’s best to store it at room temperature in a cool and dry place. Alternatively, you can freeze the bread to extend its shelf life. Just make sure to wrap it tightly in plastic wrap or an airtight container to prevent freezer burn. When you’re ready to eat the bread, simply thaw it at room temperature or in the oven, and it should be just as fresh as when you first baked it.
Commercial bakeries use two types of ingredients to slow retrogadation— emulsifiers and enzymes. Emulsifiers keep bread from going stale by preventing oil and water from separating. Adding emulsifiers sometimes goes by the names “crumb softening” or “dough conditioning” because it works to preserve texture. I have yet to try emulsifiers and enzymes in my homemade recipe, but feel free to experiment and let me know how it goes!


Easy White Bread (Dairy, Gluten, Egg, Soy, & Nut Free)
- Total Time: 1 hour 10 minutes
- Yield: 14 Slices 1x
Ingredients
Equipment
- Kitchen aid *See notes (if you don’t have a kitchen aid)
- Glass 9×5 dish **See notes (if you don’t have a glass pan)
Ingredients
- 1 1/2 cups lukewarm water (95–105 degrees)
- 1 rapid rising yeast packet (2 1/4 tsp)
- 2 TB sugar or maple sugar for proofing yeast
- 1/2 cup potato water (1 medium sized potato & 1 cup water) ***See Notes
- 2 TB vegan butter (or homemade), softened
- 1/4 cup applesauce
- 4 cups gf all purpose flour, (if xantham gum free, which is usually derived from corn) use rice flour & 1/2 tsp guar gum & 1 TB tapioca starch
- 1/4 cup sugar
- 1 tsp salt

Instructions
- Preheat oven to 360 degrees
- Proof yeast with lukewarm (95-105F) water and sugar in a bowl for 15 mins. Your yeast mixture should become foamy. If it didn’t foam about 1/4 inch on top, throw that batch out & repeat this step, because your yeast was bad or your water too hot.
- In a kitchen aid, or by hand, add in all ingredients and mix till the batter is smooth. Batter should be very sticky and gooey, but not runny. If too dry (it’s too dry if you can form the dough into a ball), add in 1/8 cup more water or non dairy milk till you reach the desired consistency like picture below

- No need to let the dough rise for this recipe. (Doing that will actually make this dough flatten), so scoop mixture onto floured parchment paper.
- Per Bear: Scoop some of the sticky dough onto the flour. Roll dough into 6 small balls for the arms legs and ears, one mini one for the nose, a medium one for the head, and a large one for the body.
- Press the dough balls together so they stick, and use just egg to

- Bake 50-55 mins till top is dark golden brown. The following picture means the bread isn’t done yet (it will be too gooey in the middle still). Cook till bread is as golden brown as the second picture below:


- Let cool in bread pan 10- mins. Then carefully flip over the pan to get the bread out.
- Put in a ziploc bag to store in fridge overnight and cut into 14 slices the next day. (It’s easier to cut after it has been in the fridge) Will keep up to two weeks in fridge or 4 months in freezer
- This bread is delicious in many ways. My favorite way is simple: toasted with homemade vegan butter. Enjoy!!
Notes
*If you don’t have a kitchen aid, you can mix by hand, but your bread will come out more dense. You really have to whisk your mixture hard when mixing by hand to get a good finished product. Kitchen aid is definitely a better option for this recipe.
**If you don’t use a glass pan, your bread will not rise well and the finished product will be super dense. Highly recommend using a glass dish for this recipe!
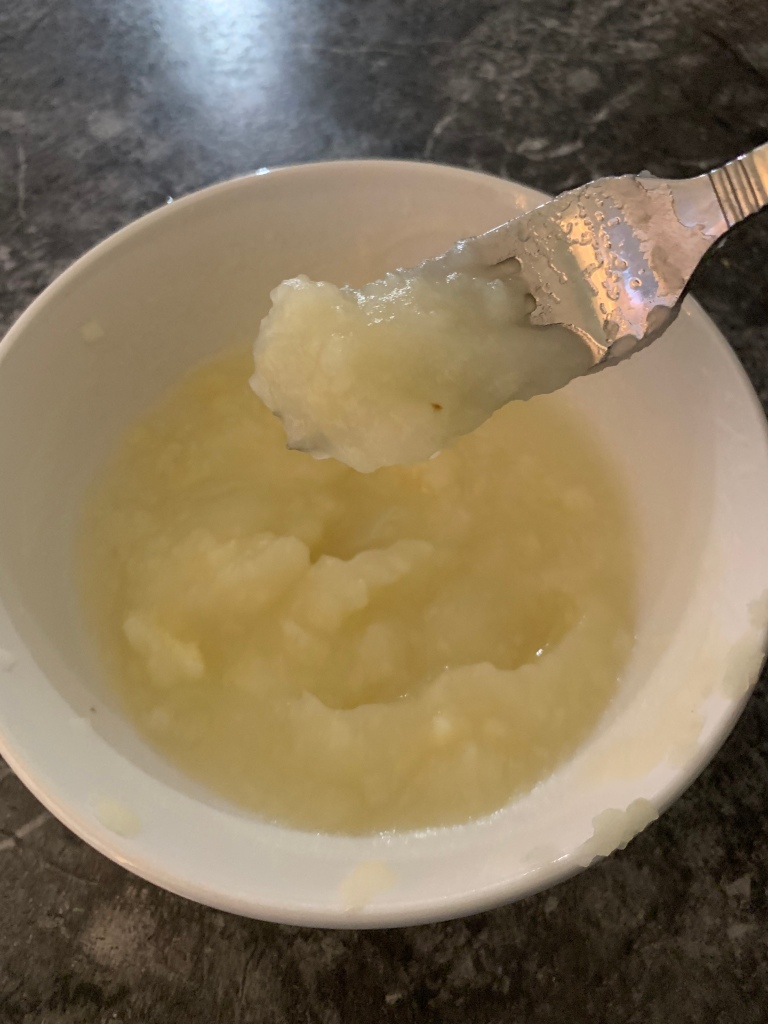
*** Instead of using non dairy milk like most bread recipes, I like to use 1/2 cup potato water. (You can also use sweet potatoes or applesauce if nightshades are an issue; but it will not rise as much). The potato water makes the final product taller, fluffier, and moist. To achieve this potato water, I mash up one small boiled potato with 1 cup water until you get a mushy runny paste (kinda like applesauce). I then use 1/2 cup of this mixture in the recipe. See picture below for the right consistency:
Below is a size comparison of Costco’s store-bought bread containing gluten at the top and my allergy friendly bread on the bottom.

- Prep Time: 15 Min
- Cook Time: 55 min
This bread is SOOO good! It’s my first gluten, egg, and soy free bread recipe that tastes amazing! Everyone should try this allergy friendly bread!
This is the best top 9 allergen free bread we have ever had. Recipe is easy to follow and easy to do!
This bread is *delicious*. This recipe has given me a sense of normalcy I hadn’t been able to have in such a long time due to my diet restrictions. I literally cried the first time I ate it. No joke! 😂